Downloadable Wallet Pattern
***Note: I updated the instructions on the coin pocket (3-21-11) here on the blog. I will upload a revised version of the PDF pattern soon. After re-reading the instructions I found a better and easier to understand method of inserting the pocket. Also Rachel at The Titus 2 Homemaker has a great photo filled tutorial on inserting the pocket. Thanks Rachel!
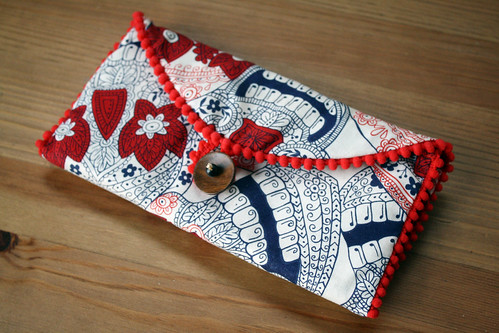
I intended on posting a pattern for this wallet sooner after I shared it but stress at work and complicated instructions got the best of me and it took me an extra couple days to finish. But now it is up and read to download!
Click to Download the PDF Pattern! As always, print without scaling and match up the lines and notches of each sheet. Included is a mini diagram of what all the pieces should look like together.

I designed this wallet on the fly with a ruler and hoped for the best. I used the finished measurements to make the pattern pieces.
If you've never made a wallet before here are a few tips:
- It seems like a lot of work but it isn't. Really, it's just a lot of folding, layering and top stitching. But to be safe read and reread the instructions until you can picture making the wallet in your mind. That will help keep you from getting confused in the midst of sewing.
- I thought I could get away with using minimal interfacing but the resulting wallet isn't stiff enough for my tastes. I recommend (and the pattern calls for) fusing interfacing to the wrong sides of all pattern pieces.
- Obviously this wallet is meant to hold American dollars - you people with the Euros and all those different sized currencies... well, sorry. Perhaps you could adjust your measurements or just fold your bills if they are too big for the pockets.
Also: Because I'm all about using scraps and/or minimal amounts of fabric I made this pattern so as not to waste fabric. If you fuse interfacing to the wrong sides of the interior pockets then that interfacing will be exposed *inside* the pockets. You won't see the interfacing by looking at the wallet but if you pull back the money pocket, for example, and look underneath you can see it. If this sort of unfinished-ness bothers you, just cut an extra piece for those pockets and instead of folding under and topstitching the edges of the fabric, sew the two fabric pieces you cut together by folding the edges down 1/2 in and matching the pieces with wrong sides facing and top stitch together.
1. Cut out all pieces and apply interfacing. On the Outside, cut along the dotted line in the center of the piece. Fold back the opening underneath to the wrong side of fabric. This will be where we insert the zipped pocket.

Note: After making this pocket I realized there was a better way to do it so I changed the pattern pieces and instructions to match the better way. The pictures depicting the pocket may not look exactly like yours but you can get the idea.
2. Pin the top edge of the Coin Pocket Lower right side to the top edge of the zipper wrong side, matching long edge. Stitch 1/8 in seam along the edge.
Note: since I originally made my wallet's pocket a different size my pocket piece is smaller than yours will be but this image still helps you put the idea into perspective.

3. Pin the top edge of the Coin Pocket Upper right side to the bottom edge o the zipper wrong side. Stitch 1/8 in seam along the edge. Pull back fabric and press seam so that zipper is flat.
Now we have to attach the coin pocket to the Outside.
4. First, make sure the zipper is facing up and the two fabric pieces are separated from each other and fabric right side is facing down and zipper right side facing up. Center the cut opening of the Outside on top of the zipper and pin the opening to the zipper. Attach the Outside to the zipper by stitching all the way around the edge of the cut opening.

5. Next, to close the coin pocket, fold back the Coin Pocket Lower piece so the bottom edge matches up with the bottom edges of the Coin Pocket Upper Piece, pin. Stitch a 1/4th in seam along the bottom edge of the two pieces. Press the pocket flat against the Outside piece.
Yay, you've finished the zipped pocket. You will close up the sides of the coin pocket when you sew the Outside and Inside pieces together.
6. For the interior pockets fold under the top edges (the sides that will be open to slip money/cards into) 1/4 in. Press, fold under again 1/4 in and topstitch.
7. Layer the Money Pockets over each other, right sides facing up with bottom edges matching. With them together, fold under 1/4 in. Press, fold under again 1/4 in. Place the pockets' bottom edge along the dotted line on the Inside. Pin and topstitch.

8. Match the bottom edge of the Card Pocket to the straight edge of the Inside. Pin and topstitch along dotted lines to create dividers.
Now the interior is taking shape. All that is left is to attach the inside to the outside and create the closure.
9. On the Outside, attach button over the small circle.
10. Make a loop out of a piece of trim or ribbon long enough to fit around the button. Place the loop on the Outside with the raw edges matching the raw edge of the fabric, pin.
11. If you want to include trim or piping around the outer edge of the wallet, now is the time to do that. If not, skip to #12. Place trim along seam line of long and curved edges of the Outside (right side facing up). Stitch.
12. Right sides facing pin Outside and Inside together matching raw edges. Stitch around long and curved edges. Turn wallet right side out.
Now it kind of looks a little like an oven mitt with pockets but next we'll close up that last open edge. Oh, and ignore the fact that I haven't added a button yet...

13. Fold under the opening of the bottom of the wallet 1/4 in. Press with iron and top stitch closed.


Phew, I swear making this wallet was less difficult than trying to explain HOW to make this wallet. Please ask questions if you have any!

thanks for this inspiring tutorial..
BalasHapusI'm about to start handsewing a wallet myself, but couldn't find a gut to start it..
Your tips help me to be more confident. I'll start my project soon, thanks to you :)