
You will need
-measuring tape
-paper (the bigger the better)
-pencil
-eraser
-ruler (as long as possible)
-cloth
-thread
-pins/needles
-corset boning - if possible the kind you can actually sew on the cloth.
-eyelets
-invisible zipper
-fusible interfacing
-ribbon, lace etc for finishing touches
-sewing machine
Taking the needed measures:
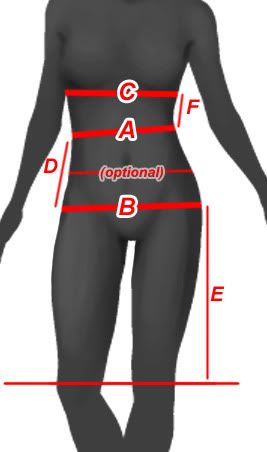
A - waist
B - hip
C - under bust
D - distance from the waistline to the hip-line (it's usually around 18-20 cm / 7,1 - 7,9 in depending on the person)
E - distance from the hip-line to the desired skirt length.
F - distance between the waistline and the under bust-line (desired height)
Making the pattern
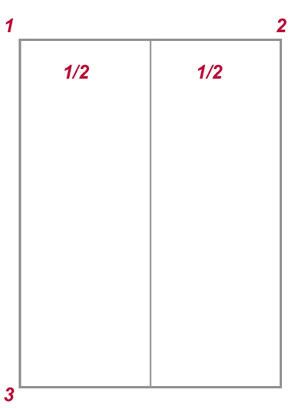
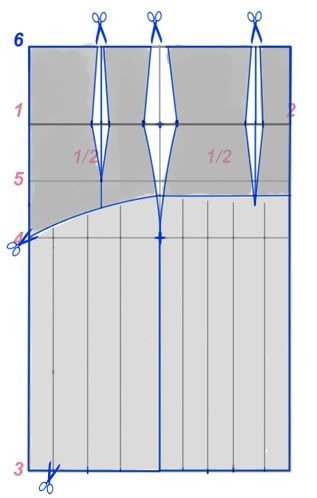
Start off by creating a box system like you can see in the image below.
The distance from point 1 to point 2 is half of your HIP measure ( let's say mine is 95 cm - the distance from 1 to 2 is 47,5 cm for me then). Mark down a center point in-between - this is the side line (line going down your side). The distance from point 1 to point 3 is the length of the skirt from the waistline down (D+E)
The line going down straight from point 1 is the front folding line (front half center line) and the line below point nr 2 is the back folding line.
(Sorry for the mistake earlier! Thank you Sara for pointing that out! )
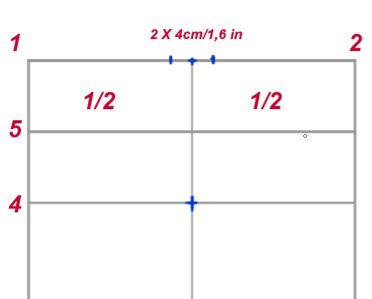
Line nr 4 is the hip line. The distance between the hip and the waist line was D. The line nr 5 is exactly in the middle of the two lines. It's not necessary, just helps with the hip line drawing later.

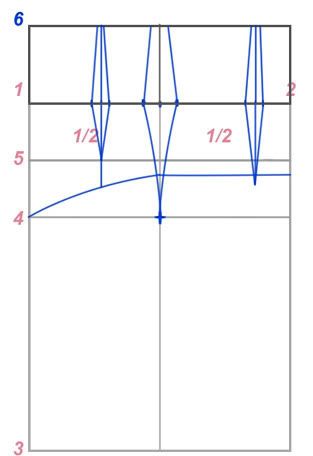
Next we'll draw out the hip curve. From the middle line measure the given distance to both sides.
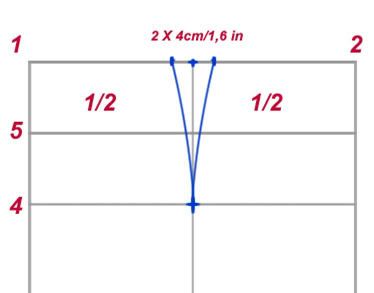
Now draw a curved line from the bottom point (on the hip-line) to the points you marked previously. Make sure the curves are exactly the same. This line will make the skirt hug your hips naturally - you might have to check the curve in a fitting though.
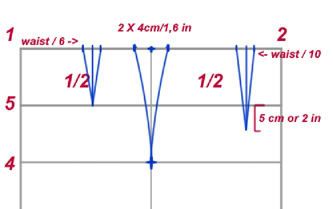
To make the skirt hold against your figure better even more, add small darts to the front and the back of the skirt. The width of the darts can be calculated from the waist and hip measurements with ease. For example, when the waist is 70 cm, hips - 95 cm it goes like this: 95 - 70 = 25 / 2 = 12,5 - (2x4)= 4,5 this means you have 4,5 cm to use for the darts. I'll divide it in half so, 2,25 for the front and 2,25 for the back. The length of the darts on the front side of the skirt is half of D, while the length of the darts on the back is ½D+ 5 cm/2 in. The distances of the darts:
- on the front piece from the front center line towards the hip curve waist /6 (ex: 70 cm/6=11,6 cm)
- on the back piece from the back center line towards the hip curve waist /10 (ex: 70 cm/10=7 cm)
Now you have your basic skirt pattern all ready. If you wish, you can save it for later use and make a copy of it to continue making the high-waist skirt.
To make the waistline come up, draw a new line above the already finished pattern. The distance from point 1 to point 6 is F
Now find out how much you need to take in from the bust-line. C-A = 76 cm - 70 cm= 6 cm / 2 = 3 cm. This means I can take in 3 cm with the dart tips. you can use the most of this on the vertical hip line. Now connect the points and finish the patterns darts.
Now you can draw out the shape of the corset part. You can make it angular like mine or you can make it straight or oval. You can be creative at this point. Extend the middle line of the dart in the front so that it reaches the corset bottom line.
NB! At this point, you can still move around the darts. If you want them to be placed differently now is the time to move them.
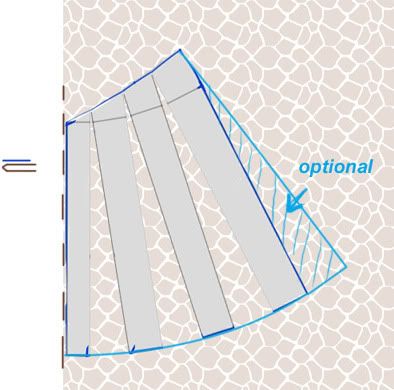
Now once you've finished the pattern and all firs (remeasure many times to avoid mistakes) you can cut out the patterns. To make the skirts bottom part wide and flowy, cut it to strips while leaving a tiny bit uncut at the top. Later I'll show what to do with them.
Ok so the bottom part of the skirt is to be placed on cloth like this: the cloth folded in half and the folding line and the front/back center lines aligned. Now start placing the strips of the pattern apart while you make sure that the distances between each strip are about the same. Once that's done draw the new bottom line on the cloth. You can add a bit more width to the skirt by adding a bit more to the side, but you dont have to.
Option 2: for a folded or gathered skirt, cut the strips apart completely and place them apart according to the size of the folds or the amount of gathering.
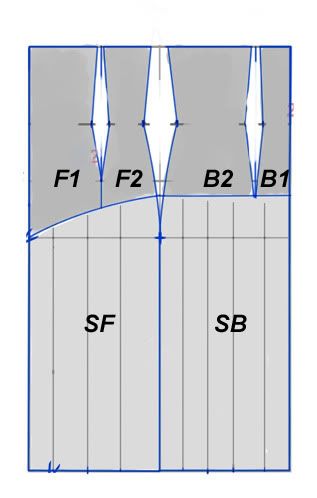
Okay. Now to place all the pattern pieces on the cloth. You can choose how you want to fold the cloth but make sure that the parts- where the center lines are - are neatly aligned with the cloths folding line. Otherwise you'll have 2 pieces of fabric instead of 1 later. The corset will be 2 layered thus we'll need to cut out twice as many details for it. You can use a different cloth for it, even lining if you want to( but for now le's pretend you're using the same material). Try to save as much cloth as you can, you'll need a few more pieces later. Use chalk to mark down the outlines of the pattern pieces.
!!! Dont forget the seam allowance!
Mark down the waistline spot on the cloth for easier assembly!

Naming your pattern pieces is a good idea. You'll be able to tell them apart that way later.
Getting ready for the first fitting!
Now take one set of the corset details and apply fusible interfacing on it to make it a bit more sturdy. This will be your inner layer where you'll sew the boning on later.
Sew one set of the corset details together with mildly strong thread - by hand along the chalk lines. Once the corset part is all together (leave one side open where the hidden zipper will be later) sew together the two bottom parts of the skirt the same way.. Next attach the corset part to the bottom and try it on. Fasten the one open side with pins while you're wearing it. If you cant get it to close, then you have to take it all apart and stitch it all together again, leaving less seam allowance (thus giving more width to the details).
Once all fits separate the bottom from the corset part and you can begin sewing the bottom parts together. Leave space for the zipper!
If you made changes to the pattern of the corset part in the fitting, make sure you transfer the changes to the other set of details as well.
Sewing the corset part:
Sew one set together at a time starting with the inner set (the one with the fusible interfacing). Make sure the seams are straight and follow the pattern outline (or the new outline you made after the fitting). It's important to know which pieces are supposed to be sewn together.
Once the two sets are all ready take the inner set and your corset boning. Sew a strip of the boning on each seam, making sure to leave some space between the chalk line and the boning so that the seam allowance has a place to fit to later. It's good to fasten the boning with two lines of stitches ( | | ).
Before you begin sewing the outer set, cut out 2 strips from the fabric and apply fusible interfacing on it. The measurements according to the length of the corset and the size of the eyelets. The width of my eyelets is 0,4 cm / 0,2 in, the width of the strip of cloth I cut out was 4 cm/ 1,6 in.
1 - strip folded half, right sides inside, sewn from the top and bottom.
2 - strip turned right side out, pressed, seam allowance line marked on the strip.
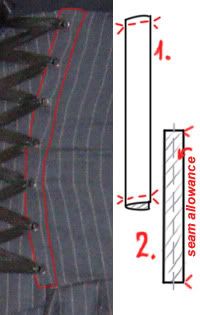
The strip is to be sewn between two front (or back, depending on your skirts design...) details so, that there is room for the eyelets to be fastened later.
Finish sewing together the outer corset details. Make sure you leave the right seam open for the zipper! Check by placing the layers on top of each-other wrong sides facing.
Next we sew the inner and outer layer together at the top. Place them so that their right sides are facing. Align the seams and pin them down. Sew together by hand first, then by machine.
Then place the outer layer on top of the skirts bottom part. Make the side seams align, the front central lines likewise. Pin, sew and press the seam allowance up towards the corset.
Take the invisible zipper (How to sew an invisible zipper) and sew it on the outer layer and the skirts lower part, leaving the inner layer unattached.
Once that's done, fasten the inner layer on the zipper fabric and the outer layers seam allowance so, that the zipper can open and close freely while the upper corners look clean.
The last sewing step for now is the fastening of the inner layer to the corsets and the skirt parts seam. Turn the seam allowance in, stitch the layer in place by hand so, that there is at least 0,2 cm / o,1 in cloth over the seam line. From the right side of the skirt, sew along the seam thus fastening the inner layer permanently to the corset.
You can do almost anything you wish to the bottom hem of the skirt. You can add lace, strips of other cloth, ribbons, beads etc.
Once the hem's ready, fasten the eyelets and weave the ribbon through them.
The skirt it ready to be worn!
Thank you for reading!
I would love to see what you make with this!
Tidak ada komentar:
Posting Komentar